Friday, January 31, 2014

Day 12: "Breakfast" Burgers

It's Friday!  That means we get to pretend we're eating out. (See post from Day 5.) Tonight, Red Robin.  We love a good burger.  I love making burgers because you can really do it different every time, and as long as you have the basics to a good burger down, it'll always taste great!  I had never had a fried egg on a burger until we ate at Red Robin.  We've been there quite a few times, and I always wish I could order at least 5 burgers or sandwiches--I can't nail down a favorite!  But I did love the burger with the fried egg on top.  That's what I "re-created" tonight, with bacon, too!  Our burgers consisted of the patty, egg, bacon, cheese, lettuce, and barbeque sauce.  Yum!  Served with fries and a salad.

 Here are some basics I think make an excellent burger patty:

- good meat (80/20--gotta have a little fat!)
- mayonnaise or sour cream (keeps it juicy even if you overcook a tad, and can cool the senses if you like your meat spicy like we do)
- seasoning!  Change it up--I play around with onion flakes, garlic powder, dried oregano, hot sauce, chipotle chili powder, and paprika.  I don't always use them all, and I love to mix and match--whatever I feel like.  However, salt, pepper, and parsley flakes are a MUST--they are in all my burgers.
- good cheese
- hearty bun (grilled with butter always adds a little extra!)

Go ahead, make it a "fast-food" night in!


Thursday, January 30, 2014

Day 11: Spaghetti & Meatballs

On a night when I want dinner on the table by 5:00, spaghetti and meatballs is perfect!  I usually make a huge pot of sauce (and meatballs) on a Saturday or another day off then freeze the leftovers in batches to pull out on rushed evenings.  Randy could eat a good sauce right out of a bowl with a spoon.  When he used to work third shift, he would sometimes just eat a small bowl of my leftover spaghetti sauce for "breakfast" when he got home for work.  So being married to an Italian makes it imperative that my homemade sauce be excellent!  The recipe is almost never the same, I change it up based on my mood or what we have in the house--meatballs, meatless, chunky, smooth, extra garlic, extra basil, extra cheese?  Yes, please!  The fundamentals of a good sauce stay the same, however.  I always have Randy taste-test throughout the cooking process (which is an all-day affair) and he is more than happy to oblige!  The core of the recipe was handed down to me by my mother, and I adapted it from there.

Spaghetti Sauce
olive oil
1 lg onion, chopped
3-4 cloves of garlic, chopped
dried Italian herbs (basil, oregano, parsley)
1 bay leaf
28 oz tomato sauce
28 oz tomato puree (here's where you can add variety--buy diced or crushed tomatoes instead for extra texture)
18 oz tomato paste
24-30 oz water (or chicken broth)
1-2 tsp sugar
red wine
handfuls of grated parmesan cheese
salt, pepper
fresh Italian herbs (basil, oregano, parsley)

Start with the onions and garlic and olive oil in a large stock pot over medium heat.  Add the dried herbs (to taste) and the bay leaf.  Cook down until the onions are translucent.  Add the tomato products and water and stir to combine and break down the paste.  Add the sugar.  (This kills the bitterness of the tomatoes--baking soda will also work.)  This is the point where you might want to add the meatballs if you are using them.  They will cook all day in the sauce.  Let these ingredients come together for a while, simmering on the stove.  Somewhere during mid-day, add some red wine (a few turns around the pan), salt, pepper, and cheese.  You can also add more dried herbs if you want.  Let the sauce continue to simmer.  Only about 30-60 minutes before you want to serve, add the fresh herbs.  Fresh herbs should always be added last and late so they keep their bright body and flavor!

Italian Meatballs (This recipe is for 1 lb meat, double or triple the recipe accordingly.  The measurements are so easy, I never measure anymore!)
1 lb ground meat
1 egg
1/2 cup Italian breadcrumbs (if you use plain breadcrumbs, just add Italian herbs to the meat)
1 tsp Worcestershire sauce
1 TB onion flakes
salt, pepper, parsley

**You can add the meatballs to the sauce uncooked, if you are cooking the sauce all day--they will cook thoroughly in the sauce by themselves.  My husband prefers a sear on the outside of his meatballs, so I do a quick turn in the skillet before I add them to the sauce.  Then in the same skillet, I cook up some ground sausage to add to the sauce.  I then deglaze the skillet with a red or white wine and pour that into the sauce as well.

Wednesday, January 29, 2014

Day 10: Mozzarella, Tomato, Basil Panini

On a night when Randy is working late and most likely heading to his second job right from his first, :(  Abby and I usually have something simple--PB & J, mac & cheese, or cereal. It's not that I don't enjoy cooking for my daughter, it's just that night's alone with 2 kids (and bath-time!) are easier when dinner is a non-issue.  So I present to you today: lunch!
I've said before that one of the ways I show Randy my love is by presenting him with good-looking and great-tasting meals.  (This is in no way something I believe all wives should do, it's just what I do--we all show love in different ways!)  Lunch is no exception.  I never used to care what I made myself for lunch until Randy started his internship this past fall.  It was the first time he would be out of the house all day, everyday, and need to pack a lunch.  So naturally, I started packing his lunch for him.  All of a sudden, I realized how awful my own lunches were--packed on a whim, no effort--sometimes I would just go without lunch!  But now that I pack Randy good, well-balanced lunches, I have better lunches, too!  We love sandwiches, so I usually try to mix them up a bit with wraps, subs, or paninis.   I don't have a panini press, so I either use my grill-lined cast iron skillet, or a flat skillet.  Then the panini can be warmed in the microwave at work before eating.

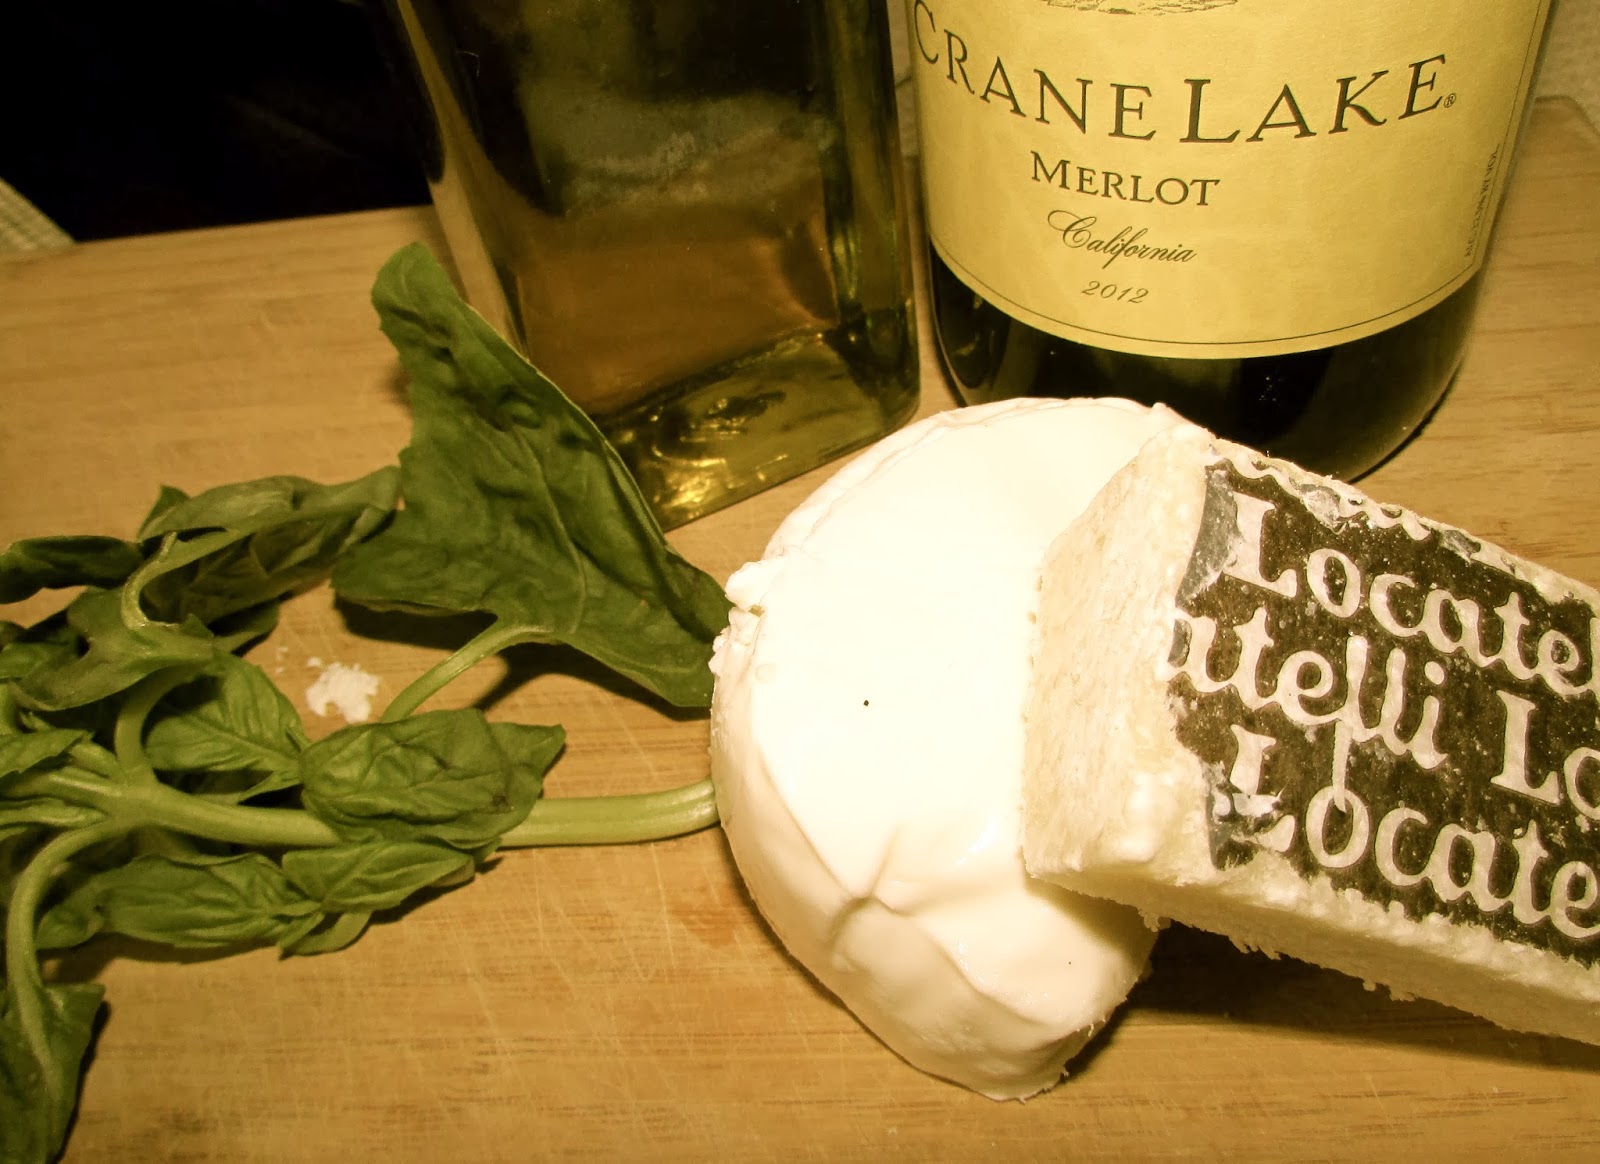
The recipe for the panini itself is simple: spread basil pesto (recipe follows) on both slices of bread, and stick a few slices of tomato and fresh mozzarella cheese in the middle.  Set the sandwich on a panini press or a buttered skillet and press down (a foil-wrapped brick, or heavy pot works).  Turn when golden on one side.  Press down again.


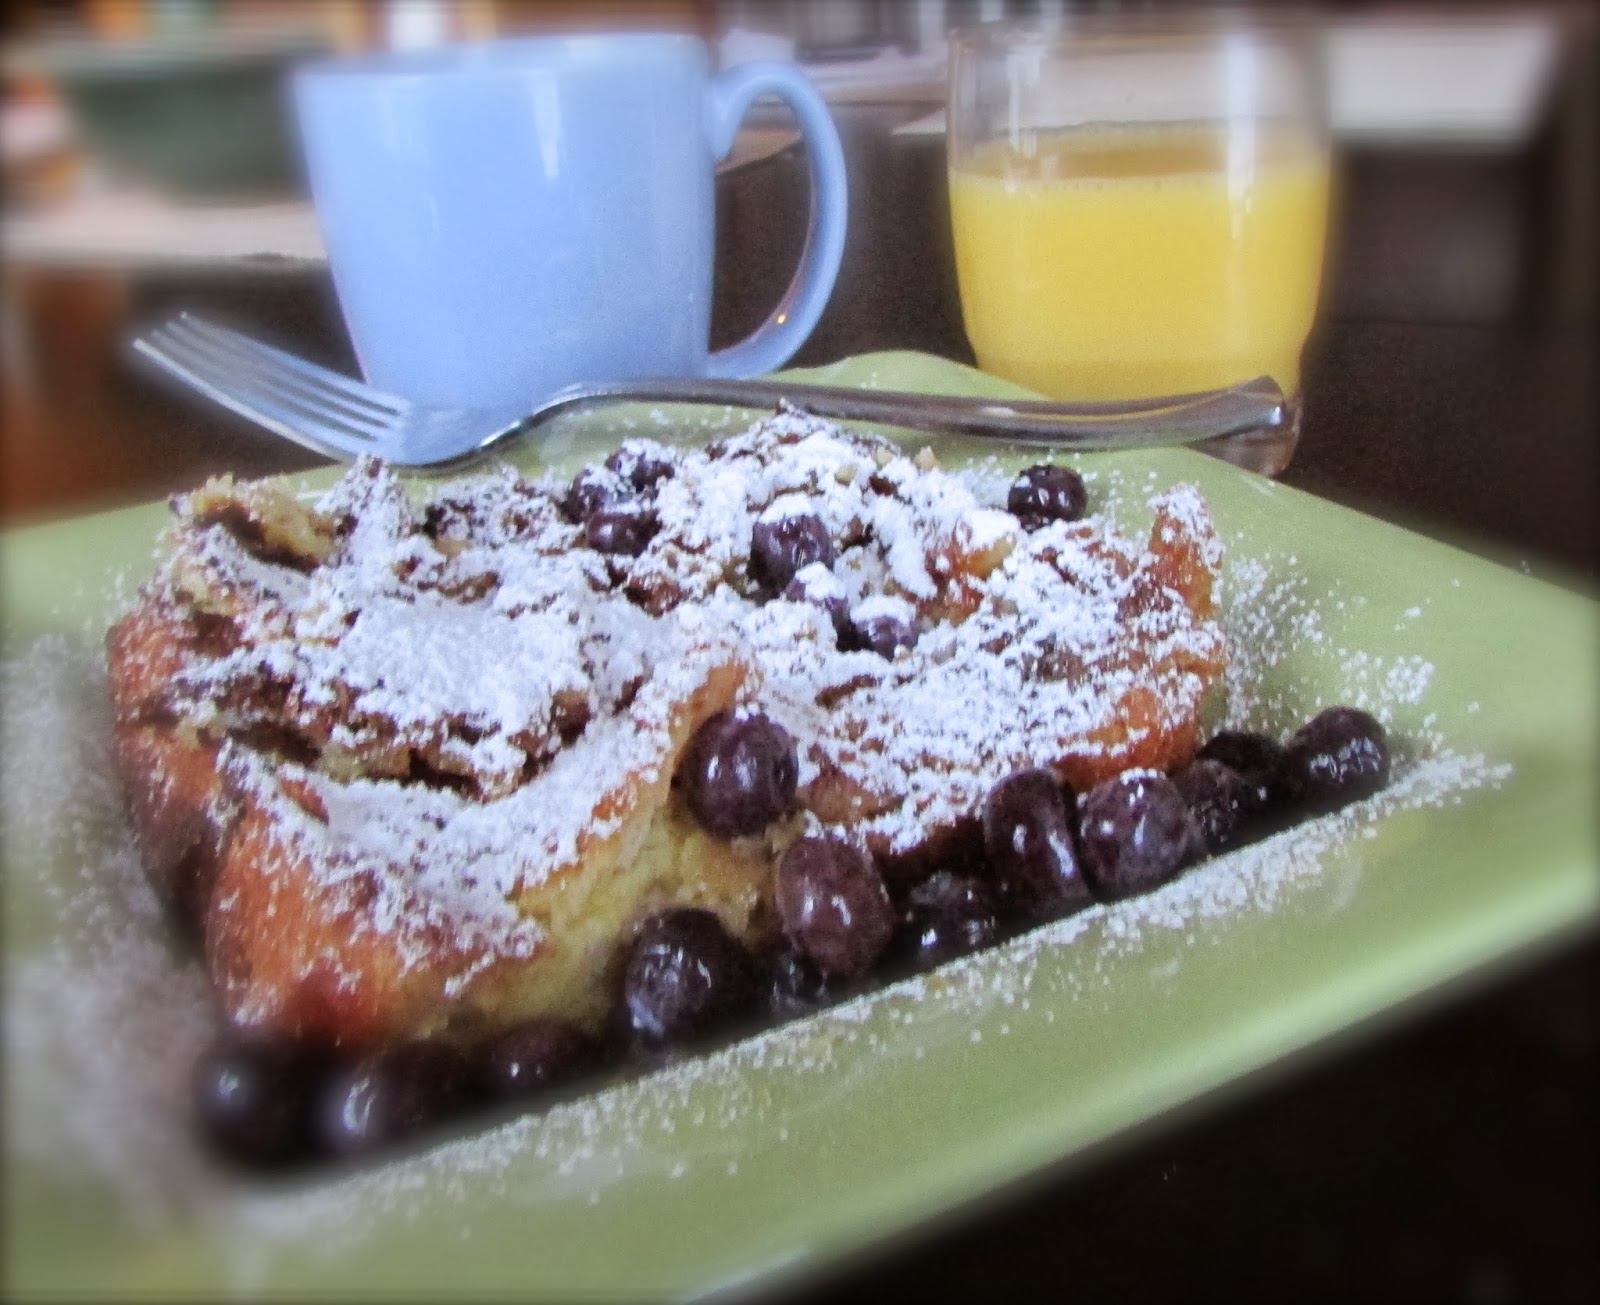
There's nothing like a sandwich made on fresh bread!  Yes, I occasionally make my own bread.  It's really easy, and makes sandwiches so much better!  I was home yesterday with my sick baby and took advantage of some down-time.  I made Ina Garten's honey white bread.  Here's the recipe:

1/2 cup warm water (110*)
2 pkgs dry yeast
1 tsp sugar
1 1/2 cups warm whole milk (110*)
6 TB unsalted butter, melted and cooled
1 1/2 TB honey
2 extra-large egg yolks (I use large and it still comes out great!)
5-6 cups flour
1 TB kosher salt
1 egg white, lightly beaten


Mix the warm water, yeast, and sugar in a bowl and let dissolve 5 minutes.  (You can use an electric stand mixer with the hook attachment, or mix the dough manually.)  Add milk, butter, and honey and mix on medium speed until blended.  Add the egg yolks, 3 cups of flour, and salt.  Mix on low for about 5 minutes.  While mixer is on low, slowly add the remaining flour until the dough doesn't stick to the bowl.  Knead dough in bowl for about 8 minutes, adding flour as necessary.  Dump dough onto a well-floured surface and knead by hand 1 minute.  Roll in a butter-covered bowl and let sit under a damp cloth for about an hour.  Then divide the dough and place into 2 greased 9 x 5 inch loaf pans.  Cover with a damp cloth again and let rise another hour.  Bake at 350* for 40-45 minutes.  Turn out of the pans and cool completely before slicing.  (I freeze one loaf.)

Pesto


I use as much basil as I have on hand at the moment (usually at least one bag's worth, or 50-60 leaves).  Wash and place in the bowl of a food processor.  4-5 cloves of garlic, roughly chopped--added to the basil.  Sprinkle a little salt and pepper.  Once the processor starts, drizzle in some extra virgin olive oil slowly and watch for the consistency you want to appear.


Randy's lunch.  He'll need some mint gum after that panini!

Tuesday, January 28, 2014

Day 9: Parmesan-Crusted Chicken, Asparagus, Rice

I love nights when I don't have to follow a recipe.  I got this idea for chicken from a commercial a while ago and it looked good, so I tried it one night. The family loved it!  Sometimes I make it with just mayonnaise and parmesan cheese, sometimes I add breadcrumbs, and sometimes I add fried onions, like tonight.  So easy and scrumptious!  I also love roasted asparagus--this is 1 out of 3 ways I make asparagus (roasting it).  I happened to have leftover prosciutto from last night's dinner, so I wrapped the asparagus in it--first time I've done that.  I served a box rice on the side.  Here's the basic recipe for tonight's dinner:

Chicken
Season the chicken breasts with salt and pepper.  Spread mayonnaise on both sides of the breasts.  Then roll the chicken in a mixture of crushed fried onions and grated parmesan cheese.  Bake at 400* for about 30 minutes or until cooked through.

Asparagus
Wash the asparagus and cut the ends off.  Wrap bunches or single stems in prosciutto.  Lay on a baking sheet and drizzle with extra virgin olive oil.  Lightly season with salt and pepper.  Bake at 400* for 5-10 minutes to desired tenderness.  Garnish with lemon juice.

In the words of my darling daughter, Abigail (who eats everything we do), "Mmm, it's yummy!  Thanks, Mommy!" :)

Monday, January 27, 2014

Day 8: Portuguese Cod with Potatoes and Green Beans


Found this recipe in one of my Rachael Ray recipe books.  Looked good and different, so I tried it.  It was great!

2-4 cod filets (however many you need-I used 2)
1 onion, quartered and thinly sliced
3-4 cloves of garlic
28 oz can diced tomatoes
4-8 slices of prosciutto
3-4 potatoes, peeled and thinly sliced
green beans
salt, pepper, olive oil

Preheat oven to 425* and place a large cast iron skillet in to heat.  In a saucepan over medium-high heat, saute the garlic and onions in olive oil.  Add the tomatoes to simmer.  (I also added a pinch of sugar to cut the bitterness and some salt and pepper.)  Drizzle oil, salt, and pepper on the cod filets and place them in the hot skillet and in the oven for 7-8 minutes.  At this time, heat a skillet over medium-high heat with some olive oil, and add the potatoes to start cooking.  After the 7-8 minutes that the cod has been roasting, pull the filets out and pour the tomato sauce over them and about 2 slices of prosciutto on each filet.  Place back in the oven for 8-10 minutes.  Turn the potatoes once or twice while cooking.  They will be done when browned.  Blanch or steam the green beans for about 5 minutes and season with salt and pepper.  Serve hot, altogether.

Sunday, January 26, 2014

Day 7: Mighty Minestrone & Cornbread

There are several different variations of this soup out there.  Here's a variation I made tonight:
Minestrone Soup
1 onion, chopped
4 cloves  of garlic, minced
4 carrots, sliced
2 stalks of celery, chopped
1 bay leaf
few sprigs of fresh rosemary and thyme, chopped
salt, pepper, dried oregano, red pepper flakes
15 oz can of chickpeas, drained
15 oz can of cannellini beans, drained
1/4 cup tomato paste
1/4 cup dry white wine
4+ cups vegetable stock
water
1 lb ditalini pasta
1/2 bunch kale, chopped
more salt & pepper!
parmesan cheese

In a large soup pot, heat some extra virgin olive oil and saute the onion.  Add the garlic, carrots, celery, bay leaf, rosemary, and thyme and season with salt, pepper, oregano, and a sprinkle of red pepper flakes.  (It's helpful to rub the dried herbs between your fingers first to release more flavor.)  Cook down 3-5 minutes until the vegetables are soft.  Add the chickpeas, beans, and tomato paste and cook a few minutes until the paste smells sweet.  (The paste will literally smell bitter at first, and then it will smell sweet after a few minutes.)  Season with more salt and pepper.  Add the wine and allow alcohol to cook off.  Add the vegetable stock and about 3-4 cups of water.  Add the kale to wilt and bring to a boil.  Once the water starts boiling, add the pasta and reduce heat to medium for the pasta to cook (about 8 minutes).  Let simmer until ready to eat!  Sprinkle with parmesan freshly grated parmesan cheese when ready to serve.  (*Note, I've heard from many chefs on my favorite network, The Food Network, that adding the rind from parmesan cheese wedges to soups is a great way to season!  I do it in all of my soups now, and love the extra salty, nutty taste it brings to my soup!)

Cast Iron Skillet Cornbread
(Randy LOVES cornbread, and swears this recipe is the best he's ever had!  Courtesy of Chef Alex Gaurnaschelli)
1 1/4 cups cornmeal
3/4 cup flour
1/4 cup sugar
1 tsp salt
2 tsps baking powder
1/2 tsp baking soda
1/3 cup whole milk
1 cup buttermilk
2 eggs, lightly beaten
1 stick butter, melted

Preheat oven to 425* and place 9-inch cast iron skillet inside to heat.
In a large bowl, whisk together the dry ingredients.  Add the milk, buttermilk, and eggs to combine.  Add most of the melted butter, reserving about 2 Tbsp.
Remove the skillet from the oven, and reduce the temperature to 375*.  Coat the skillet with the remaining melted butter, and then pour in the batter.  Bake until center is firm, about 20-25 minutes.  Allow to cool 10 minutes before serving.

Saturday, January 25, 2014

Day 6: Go-To Make-Ahead Meal: Stuffed Shells

When Randy and I were engaged, I often made dinner for us on Saturday nights at his condo.  One weekend I told him he could request a meal.  When I arrived at his place, he was sleeping (he worked 3rd shift at the time) and he had left me a note requesting stuffed shells.  I remember the note because he also drew a picture of two bumblebees in love. :) I had never made stuffed shells before, but I had a basic idea, so I threw something together.  Since then, I've learned more about herbs and cheeses and LOVE my recipe.  It's the number one thing I make when I need a meal for a friend, or something to make ahead for our family, or to bring on vacation.  And it's always a crowd-pleaser.  Today, I made a large recipe to divide into 3 square disposable pans (1 for our freezer and 2 for a friend).  I will use the quantities I used today to write out this recipe:

1 box jumbo stuffing shells
2 packages ground sausage (1 sweet, 1 hot)
1 large onion, chopped
2 cloves of garlic, chopped
32 oz ricotta cheese
1 cup grated parmesan cheese
dried basil, oregano, parsley, salt, pepper
3 cups sauce (I use homemade sauce--recipe to come later in another blog)
1 ball (plus a little more) fresh mozzarella cheese
other fresh cheeses to use on top may include: asiago, parmesan, pecorino
fresh basil

Bring a large pot of water to a boil.  Season it well with salt, drop in the shells.  While they are cooking (just to al dente), brown the sausage in a skillet.  Add the onion and garlic and saute 2 minutes, until the onion is translucent.  Add a few sprinkles of basil, oregano, parsley.  Add the ricotta cheese and turn off the heat.  Mix well.  Add the parmesan cheese and a little salt and pepper.  Mix altogether.  This is your stuffing!
When the shells have come to al dente, drain them and run them under cold water to stop the cooking.  (It also makes it easier to stuff them when they aren't piping hot!)  Spoon the stuffing into each shell and lay in a single layer in pan.  Pour sauce over the shells, and top with lots of mozzarella cheese, plus 2-3 other freshly grated Italian cheeses.  Garnish with fresh basil on top.  Cover and freeze, or bake right away.  Bake at 375* for about 30 minutes (longer, if frozen) or until the cheese is golden, melted, and bubbling.

So tonight we went out for dinner to celebrate Randy's job offer!  I hoped to snap a picture of the meal, but there wasn't great light, and the presentation left a little something to be desired.  But, I was inspired by 2 things: 1) I will try to add prosciutto to my chicken & broccoli alfredo next time since Randy had it in his tonight and loved it.  2) I have always wanted to learn a good tomato/vodka cream sauce (I had a great one tonight), so I think I'll definitely do that at some point this year!  Bon appetit!

Friday, January 24, 2014

Day 5: Chicken Ceasar Sandwiches


When I was a kid, my family would go out to eat every Friday night.  Nothing expensive, mostly fast food (back when my dad could pay for a family of 4 at McDonald's or Wendy's with $20--those days are gone!)  The real fun was that we rotated who got to pick where we went.  Fun memories.  Now, I  can't seem to consider Friday night the same as any other weekday.  It always feels like it should be different.  I would be disappointed if I made a traditional meat, vegetable, and grain/starch meal on a Friday night.  That's a Monday meal.  Friday just wouldn't feel like Friday as a kid if it weren't special somehow.  Since we can't really afford to go out every week (and with a 2-year old plus baby don't really WANT to), I try to make a Friday night meal that we COULD get out somewhere.  Whether it's a burger/sandwich-type meal (replica of fast food), or an imitation of a steakhouse meal, my Friday night dinner has to make me think of going out to eat... somewhere... somehow...

Chicken Ceasar Sandwiches (fancy fast-food chicken sandwich!)
1 chicken breast (I use bone-in, skin-on--it's more flavorful to cook it that way and de-bone it later.  Plus, it's cheaper to buy them at the store that way.  One of my challenges this year will be to learn how to properly de-bone a whole raw chicken.)
salt, pepper
ceasar dressing (homemade, recipe follows)
greens (spinach, arugula, lettuce)
shaved parmesan cheese
ciabatta rolls
*Make it a "club"... add bacon! (I usually do...)

Season the chicken with salt and pepper.  Bake at 400* for 30-35 minutes.  Remove the skin and bones.  Slice the chicken.  Spread the dressing on the rolls, add the shaved parmesan slices, chicken, bacon (if using) and greens.  Voila!  Yummy chicken sandwich. :)

Ceasar Dressing
About 2 years ago, I desperately wanted to have ceasar salad with dinner, but I didn't have any dressing for it.  Abby was just a baby and it was too late for a run to the store--dinner was almost ready.  I looked in the fridge and figured I had enough ingredients to make the dressing myself.  I glanced through a few recipes online and then just whipped something together on my own.  Over the years, I have made minor adjustments and now have a method I love.  So this really is my own version of ceasar dressing.  Really, though, I never measure, I just eyeball it.  So I will attempt to put measurements on my ingredients here for you...

1 1/2 cups mayonnaise
2 cloves garlic
2 tsps Dijon mustard
1 tsp Worcestershire sauce
juice from 1-2 halves of a lemon (depending on the juiciness)
rounded 1/2 cup parmesan cheese
fresh parsley, chopped
salt, pepper

I start by mincing the garlic and putting in a large bowl.  Add a pinch or two of salt and press with a pestle or the back of a spoon.  Then add the mustard, Worcestershire sauce, and lemon juice and whisk together.  Add the mayo and combine well.  Finally, add the parmesan cheese, sprinkle of pepper, and the chopped parsley.  Mix well and refrigerate.  It will thicken as it refrigerates, but it will always taste great!

Thursday, January 23, 2014

Day 4: Spaghetti w/ Winter Greens


I offer this dish as proof of a QUICK and HEALTHY meal.  Contrary to yesterday's post, I actually can and often do prepare real food in a flash when needed.  Thursday nights we have lifegroup, so I need something quick, that will also feed my brother-in-law, Eric, who comes to watch the kids while we're gone.  The original recipe includes anchovies and capers, neither of which are very popular in this house, so I omitted them and added a teaspoon or so of Dijon mustard to the sauce to come close to the anchovy flavor.  The measurements here are not from the original recipe, either, they are the approximations I used tonight and I fed 3 adults and 1 child.

Spaghetti with Winter Greens
1/2 lb (or so) spaghetti
1 bunch escarole, roughly chopped
1-2 handfuls of spinach, roughly chopped
2 cloves of garlic, minced
2 squirts of Dijon mustard
sprinkle of red pepper flakes
juice and zest of 1 lemon
salt, pepper, extra virgin olive oil, nutmeg

Boil water for the pasta.  Once the water is boiling, add a bunch of salt.  (I LOVE Mario Batali's quote, "Salt it like the seawater." It really makes A TON of difference in the pasta flavor!)  Drop the spaghetti.  Once it's been cooking for about 5 minutes and has 5 minutes to go, start the sauce.  Add olive oil to a large skillet on medium-high heat.  Add the garlic and red pepper flakes.  Cook for about a minute, being careful not to burn the garlic.  Add the greens to wilt.  Season the greens with black pepper and nutmeg and the zest of a lemon.  Right before you drain the pasta, add a ladleful of pasta water to the greens.  Drain the spaghetti and add it to the skillet.  Add the mustard and the lemon juice.  Toss until well combined.
Tonight I served it with ciabatta bread.  I drizzled the bread with extra virgin olive oil and then sprinkled one of my favorite herbs, rosemary on top.  I then stuck the bread under the broiler until golden brown.  I love serving different flavored breads, it adds a little something to the meal as a whole. :)

Wednesday, January 22, 2014

Day 3: Creme Brulee French Toast (2-Hour Delay Breakfast)

There's absolutely no shame in the occasional emergency frozen pizza (especially when you have a coupon--though I am a little embarrassed that it's only Day 3 and I'm already admitting this). ;)  That was our dinner tonight, along with a garden salad, since Abby had a make-up gymnastics class at 6:00, Randy had to run to work right after, and I don't get home until 4 or later in the afternoon.  Add a nursing baby to the equation and it makes for a busy afternoon/evening!  Since a photograph of a frozen pizza isn't all that spectacular (it was DiGiorno's--and yummy!), I thought I would take this opportunity to share a favorite breakfast item in this house and the recipe for the delectable squares I made in the beginning of the week.
In anticipation of a snow-day (FAIL, by the way--2 hour delay is just not the same), Randy (who is no slouch in the kitchen, either) decided to make his famous Creme Brulee French Toast, which is prepared the night before.  I am usually the one to put it in the oven in the morning.  It's a great way to use up the rest of that loaf of Italian bread you buy at the store to go with spaghetti!  This has climbed to the top of my "what to make mom for breakfast-in-bed" list!

After bread has soaked, pre-oven.
Here's his recipe:
1 stick of butter
1 cup packed brown sugar
1 TB corn syrup
1/2 loaf stale Italian bread
5 eggs
1 1/2 cups half and half
1 tsp vanilla
1 tsp Grand Marnier
1/4 tsp salt

When it's done baking, still in pan.
Melt the butter, sugar, and corn syrup until smooth.  Pour into baking pan (9 x 13 or smaller).  Slice bread to 1 inch slices. (*It helps to slice the bread a day before you want to make this, so the bread has a chance to harden more.)  Arrange in a single layer in the pan.  Mix eggs, half & half, vanilla, liqueur, and salt.  Pour over bread.  Refrigerate overnight.  In the morning, bring to room temperature, then bake at 350* for 35 minutes.  Invert bread onto a cutting board and serve with the caramel goodness on top. :)  (You can also top with powdered sugar.)


Chocolate Caramel Oatmeal Chews
2 cups oats
1 3/4 cups flour, divided
3/4 cup packed brown sugar
1 tsp baking soda
1 cup butter, melted
1 cup butterscotch or caramel ice cream topping
1/2 cup chopped pecans (I use walnuts when I have them)
6 oz semi-sweet chocolate morsels
Preheat oven to 350*.  Spray baking pan (8 x 8") with non-stick baking spray.  Combine oats, 1 1/2 cups flour, brown sugar and baking soda.  Add butter, mix until crumbly.  Reserve 1 cup of mixture.  Press the remainder into the pan.  Bake 15 minutes.
Whisk caramel topping and 1/4 cup flour until smooth.   Once crust is out of the oven and has cooled a little, drizzle caramel over the crust.  Sprinkle the pecans, chocolate morsels, and remainder of the crumb mixture over the caramel sauce.  Bake 15-18 minutes or until golden brown.

Tuesday, January 21, 2014

Day 2: Chicken Piccata, Mustard-Roasted Potatoes, Balsamic Broccoli

I love all of the flavors in this meal!  Each part is fantastic on its own or coupled with something else (the broccoli is a good side to a steak, and the potatoes will go well with a hearty fish) but combined in one meal, it packs a pretty mean flavor punch.  Randy requested the chicken piccata when I was planning out the menu last week, and these are my go-to sides for it.  They all have something in common so the dish really comes full-circle.  You can literally pile a piece of chicken, potato, and broccoli onto the same fork-full and have a fantastic bite!  (Each recipe is courtesy of Ina Garten, though, as usual, minor adjustments were made to fit my family's style.)

Chicken Piccata
chicken breasts (however many you need for your family--I use one and slice it lengthwise since they are so big and it helps us stretch a buck)
flour, salt, pepper, egg, and breadcrumbs (for breading)
2 lemons (juiced, but save the halves)
1/2 cup (or so) white wine
3 TB butter

Bread the chicken breasts: add salt and pepper to the flour (1/2 cup, depending on how much chicken you use), beat the egg (or 2 if needed) with water in a separate bowl, and pour the breadcrumbs in a separate bowl.  Dip the chicken in the flour first, then the egg wash, then the breadcrumbs, then into a hot skillet to cook. (It's important that the skillet be very hot in order for the coating to cook onto the chicken--but watch carefully so it doesn't burn.)  Flip the chicken to brown the other side, then transfer onto a baking sheet and place in the oven to finish cooking.  For the sauce: wipe out the skillet and melt 1 TB butter.  Add the juice from the 2 lemons plus the lemon halves and the white wine.  Cook on high until the sauce is reduced by half.  Then remove the lemon halves (and any seeds) and add the remaining 2 TB of butter.  Whisk until melted in.  ***The key to a great sauce (especially a white wine sauce) is to start with butter and END with butter!  Pour over the cooked chicken and garnish with lemon slices and fresh parsley.

Mustard-Roasted Potatoes
(I usually like to use red potatoes, but didn't have any this week.)  Chop the potatoes into bite size chunks (or a little larger) and place on a baking sheet.  Finely chop an onion and add to the potatoes.  (*I'm not much of an onion fan, so I use half an onion--onion flakes would work, too, if you have a strong aversion to onions.)  Drizzle with olive oil (or extra virgin) and add a couple teaspoons of spicy grainy mustard.  Mix altogether and sprinkle with salt and pepper.  Bake at 400* for 40-50 minutes, turning once.  Garnish with fresh parsley.

Balsamic Broccoli
broccoli
1 clove of garlic, chopped
1-2 tsps Dijon mustard
1-2 TB balsamic vinegar
olive oil (1/4 to 1/2 cup, I use extra virgin)
juice of 1 lemon

Combine the garlic, mustard, vinegar, and olive oil to make a sauce.  Steam the broccoli until proper tenderness.  Drizzle with sauce and stir well to combine.  Garnish with lemon juice.  (You can serve this hot or room temperature--it tastes great either way!!!)

You may be able to tell that I don't always use exact measurements when I cook.  I've learned to know how I like things to taste and how my family likes them to taste, and I alter my recipes from there.  I'm writing the recipes how I remember them in my head and how I generally prepare them for my family.  Otherwise I would just be copying pages out of someone else's recipe book.  Of course, when it comes to baking, exact measurements are needed.  But I see cooking as more of an art form and ingredients can be changed to fit a person's style.  I don't believe cooking should be stressful, but fun!  And it may seem silly, but I really enjoy garnishing my family's food as often as possible.  I love to present my husband with pretty dishes; for me, it's part of how I show him I love him.  Bon apetit!

Monday, January 20, 2014

Day 1: Zuppa Toscana

I have a love/hate relationship with my Crockpot.  I love the idea of getting a meal prepared ahead of time, and letting it slow-cook while the flavors meld together; BUT, I am often out of the house for 9+ hours a day, which is longer than most slow-cooker recipes recommend (even on "low").  Plus, I don't really have time in the morning to do any preparations before heading to work with 2 babes in tow.  So, I usually end up saving my Crockpot meals for a day I'm home all day.  This recipe, however, I think I could do on a workday since I've discovered it tasted better the longer it simmers in the Crockpot (and I could do the prep work the night before).  Tonight was my second time making Zuppa Toscana, and it was so much better than the first time I made it, and the only thing I did different was let it cook longer.  I ran across this recipe on the internet at some point, and just made my own minor adjustments.

Here's my recipe:
1 lb (package) of hot Italian sausage (I use ground)
4-6 potatoes, chopped
1 onion, chopped
3-4 gloves of garlic, chopped
32 oz (or more) chicken broth (homemade makes a difference!)
1 bunch of kale
1 cup heavy whipping cream
2 TB flour

Throw the broth, potatoes, onion, garlic, and BROWNED sausage into the Crockpot and let cook 5-6 hours on low.  AT LEAST 30 minutes before serving, whisk the flour and cream together and add to the soup.  Add the chopped kale, salt, and pepper.  (The longer it sits, the better it gets!)

With this, I also served salad, garlic/basil bread, and for dessert: Chocolate Caramel Oatmeal Squares (recipe to come later this week).


Introduction Part II: Why Now?

I felt like my original introduction was kind of lengthy (though I don't know much about blogging, so maybe it wasn't in comparison to others) yet it didn't cover everything I wanted to say, so I thought I would break it into two parts.

I wanted to address why I'm starting this NOW.  There's a saying, "In trying times, try something new."  My husband and I have been in a sort of waiting period for a while for things to happen in order for us to start meeting some of our goals.  Emotionally, it's been hard on both of us, and now that he's graduated, it's a step in the right direction, but the waiting has also intensified.  I guess this blog is a way for me to keep my mind occupied on something else--a distraction, if you will.  I'm already pretty busy, but it's mostly with "heavy" stuff: kids, work, Bible study, housework, bills.   Hopefully this will be something light and fun to do which may lead elsewhere.

My daughter is a big reason for this, also.  She's only 2, but she's already forced me to think differently about my own life.  I always had an interest in cooking and baking, but for whatever reason(s) (fears, mostly) I never dove deep as a child/teen.  I don't necessarily regret that, but I do wonder if my life or occupation would be different now if I had.  I look at Abigail, and I want her to try EVERYTHING she wants to, unafraid.  At least, I don't want to be what she's afraid of, or who she's afraid of upsetting.  I read a blog by another mother (probably went around facebook) who learned that she was keeping her own daughter from developing her passions because she expected too much from her little girl.  Her daughter was so afraid of spilling, making a mess, or upsetting her mother that she didn't dare do the things she wanted to do.  When the mother made a change, she
watched her girl bloom and thrive and start doing things the mother never knew she was interested in.  I don't want my Abigail to be afraid of doing anything because she might make a mistake or upset me in some way.  I would love for her to discover her passions early on and pursue them at a young age.  I realize that may not happen; some people just don't find their true passions until later in life and that's okay.  This is just my own hope for my children.  And I want them to have a mother who isn't afraid to try something new, or of rejection.

As I said before, I'm already pretty busy, and I could easily say that I'll wait until summer vacation, or until I actually get to be a stay-at-home mom before doing something like this.  But then I think, there will probably always be a "good" reason NOT to do it.  So, why not now?  If this will make me a better cook, then I'd rather do it sooner than later.  And if it teaches me to be less afraid, and gives me something to pass on to my children, then I would definitely rather do it sooner than later.  So tonight starts "Day 1."  After this, no looking back, I've made my commitment.  365 days of food documentation.  I already have a few things I want to teach myself and hope to blog about those things.  I created some photo albums also, one for things I've eaten and want to learn to make--one picture in there so far.  (There are other things, too, I just never took pictures.)  This is exciting and scary and I can't wait to get started!

Sunday, January 19, 2014

Introduction: Why I'm Here

I'm finally setting up a blog!  Nothing fancy, this is primarily experimental.  Like a lot of things I do in life, I wanted a clear focus if I was ever going to be a blogger.  So I recently had the idea to document all the dinners I make for my family for a year.  I may include some breakfast, lunch, and snack items along the way.  I've always liked this idea, but was too insecure to do it.  Many people (who are better cooks than I) have done this or something like it and I always thought if I were to blog or write something about what I make, it had to be ORIGINAL.  However, as I've accumulated recipe book after recipe book over the years, I discovered that the notion of originality is ridiculous.  I'm saddened to say that I'm no longer as excited by a new recipe book--I'm too often disappointed when I peruse the table of contents to find, "Hey, I already make all this stuff!" (Then lament over the "wasted" $25-$35.)  My point is, there aren't too many original recipes out there anymore; just other people's version of the same thing.  And those people are published, with their own TV shows!  So, this is my version of the same idea countless others have done: documenting what I cook and hoping to learn from it. 

I'm a planner and always have been.  I plan a menu out for the week (or 2) which includes lunch and dinner.  Despite my high interest and growing knowledge of the culinary arts and the wide variety of recipes I know and have prepared, I still sit and wonder what to make quite often.  I'm actually amazed at how often my mind draws a blank in this area.  It's only much later that I remember that delicious meal I made 6 months ago that I forgot about and haven't made since.  When you're running around with 2 kids, a full-time job, church, and a thriving social life, things tend to slip your mind.

My hope with this blog is to remind me of what I've made and would like to make again, challenge myself to try a recipe in a different way, push my creativity (and expand my palette) in the kitchen, and inspire others to try a new recipe or have fun in the kitchen.  If only one of these things is accomplished at the end of 365 days, I will have succeeded!  I'm unsure if I will always post a COMPLETE recipe or not--some days are busier than others and may only include the title and/or picture of what I've made.  I hope to get all the recipes posted at some point during the year, though.

Please check out my complete profile and the photos I've posted (and hope to post) of food I've tasted or created, and places I've been around the world.  Also feel free to share any recipes or posts you like and want to keep.  If you try a recipe that's inspired by my blog, PLEASE TELL ME!  I'd love to hear about others' successes in the kitchen!